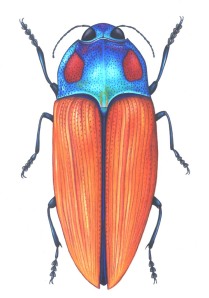
Of the 400,000 species of described Beetles on earth, and the 15,000 species of jewel beetles, Calodema blairi has got to be one of the most eye-explodingly beautiful!! Sometimes I look at a beetle so shiny and colorful that I kind of want to punch it in the face…this is one of those times.
Alas, there are only a handful of somewhat mangled photographs of this species on the internet and the specimens we have in the Academy collections are faded, SO, I decided the best thing to do would be to just go ahead and illustrate one of these little dudes.
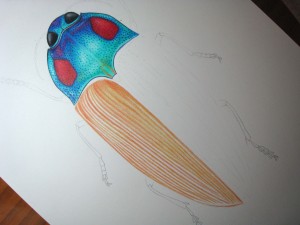
If you ever find yourself in a similar situation, here’s some tips for capturing the ephemeral yet devastating good looks of a jewel beetle:
My medium of choice are prismacolor colored pencils because of their transparency and blending qualities. Start with your pencil outline on bright white paper (to create some of the bright highlights in iridescent beetles, I like to let some of the white paper show through). My paper of choice is usually Bristol Plate/Smooth, but Vellum works as well and provides some extra texture.
*Remember to keep your pencils VERY sharp! This can be highly annoying, but I know of no other way.
Start by laying down the darker parts of the beetle first (you don’t have to make them super dark yet, in fact, it’s best to leave some white showing through): 
Once you have the dark areas shaded in, continue by laying down the lighter colors. I like to blend and overlap the lighter colors over the darker ones. Also, in areas where you want to show highlights, either apply color VERY lightly or do not apply any color at all.
Brace your wrist, because now you are going to use a white colored pencil to blend all of these colors together! This will get rid of pencil marks and give your drawing a watercolor feel. After blending in this way, I like to go back over the whole thing with another layer of all of the colors, making sure to leave those highlights white! This will give your beetle a lot of depth.
To finish my beetle’s pronotum (thorax), and show how iridescent he is, I added a bunch of black and dark blue spots. I didn’t blend his elytra (wings), with white, but rather layered the colors from darkest to lightest and added extra dark shadows on the right hand side to show that the light source is coming from the upper left (the convention in scientific illustration).


Rachel, this is really informative, The picture is great in the the step by step process. Post more of this stuff!
Thanks Shep, will do!! By the way, I didn’t know you had an illustration blog, I love it! The name really seals the deal for me 🙂
I love this image. May I use it for a writing poster in my classroom? I will not make it available in an electronic format. It will be printed on A3 paper and won’t leave the classroom.
Hi Daniel, yes by all means you can use this image in your classroom. Not sure if it is applicable in this situation, but if possible I would appreciate a credit line and link to my blog wherever you use my images. Thanks!
Thanks! Kids loved it and we did a little side lesson about copyright and asking permission for original material.